
Learning ways on how to lock cells in Google sheets is easier than you think.
One of the finest methods to create a highly collaborative team is by using Google G-Suite. Millions of people use Google Sheets to escape the monotony of Excel cells. Working together on a project in a group, with all of your data securely stored online, is a huge time saver. Locking your Google sheet cells can help you set a special edit access on who can edit the sheet you put hours into developing.
This allows you to enable the “view sheet” setting while stopping the viewer from editing specific cells.
So, if you are wondering how to navigate this particular setting, we have you. Read on to explore the step-by-step procedure for locking cells in Google spreadsheet.
How To Lock Cells In Google Sheets?
Before we dive into the complexities, let’s look into the simple steps for locking your cells.
Step 1:
To get started, open your spreadsheet and identify the cells that need to be locked. It is possible to lock some of the cells while still allowing some collaborators to edit other cells. Simply select the cell/cells you want to lock.
Step 2:
Hover over the Data menu at the top of your spreadsheet and select Protected Sheets and Ranges from the dropdown menu. Clicking on this will open a protected sheet and ranges panel on the right side of your document.
Step 3:
In the panel, enter a short descriptive text for the cells you want to lock. You can write text like” No editing” or “No Changing.” After this, click “Set Permissions” to customize the permission level of the selected cells.
Step 4:
Once you have restricted the editing access of the cell, you can also offer selective edit access to some collaborators. Click “Restrict Who Can Edit This Range” and choose “Only You” from the dropdown menu. If you want more people to edit this particular cell, click on “Custom” from that same dropdown menu.
Step 5:
When you click on Custom, you sell an entire list of the people who can edit your spreadsheet, including the cells you just selected. Select all the members you don’t want to edit the cell to make the editing access selective and click on “Done.”
Step 6:
If a collaborator who does not have access to that cell tries to edit it, they’ll receive a pop-up warning letting them know that the cell is protected. To edit that cell, they would have to request edit access.
You can follow the same steps by selecting multiple cells if you want to lock numerous cells on your spreadsheet.
Note: If you are planning to lock non-adjacent cells, you would have to select them individually and alter their editing status.
RELATED: How To Make Google Forms Pie Chart: A Step-by-Step Guide
Locking An Entire Google Spreadsheet
Other than locking just selective cells, you can also lock the entire google spreadsheet and stop other users from editing it. This means, you can make one tab in your spreadsheet locked and the other tabs open for editing.
Here’s how you can loc one sheet in your Google spreadsheet.
Start by right-clicking on the tab you want to lock. Once you do that, select “Protect Sheet” from the dropdown menu.
After this, select the sheet tab you want to lock in the “Protected Sheets & Ranges” side menu. Enter your description and click “Sheet” to select a particular sheet.
If you want to make some of that sheet’s cells editable, check the “Except Certain Cells” box and mention the cell or cells you want to unlock in that specific sheet.
Once done, click on “Set Permissions.” After this, you will see a small pop asking you about the range of editing permissions. Simply, select “Restrict who can edit this range” and click “Only You.” Click on “Done” to finalize things.
Allowing Editing With A Subtle Warning
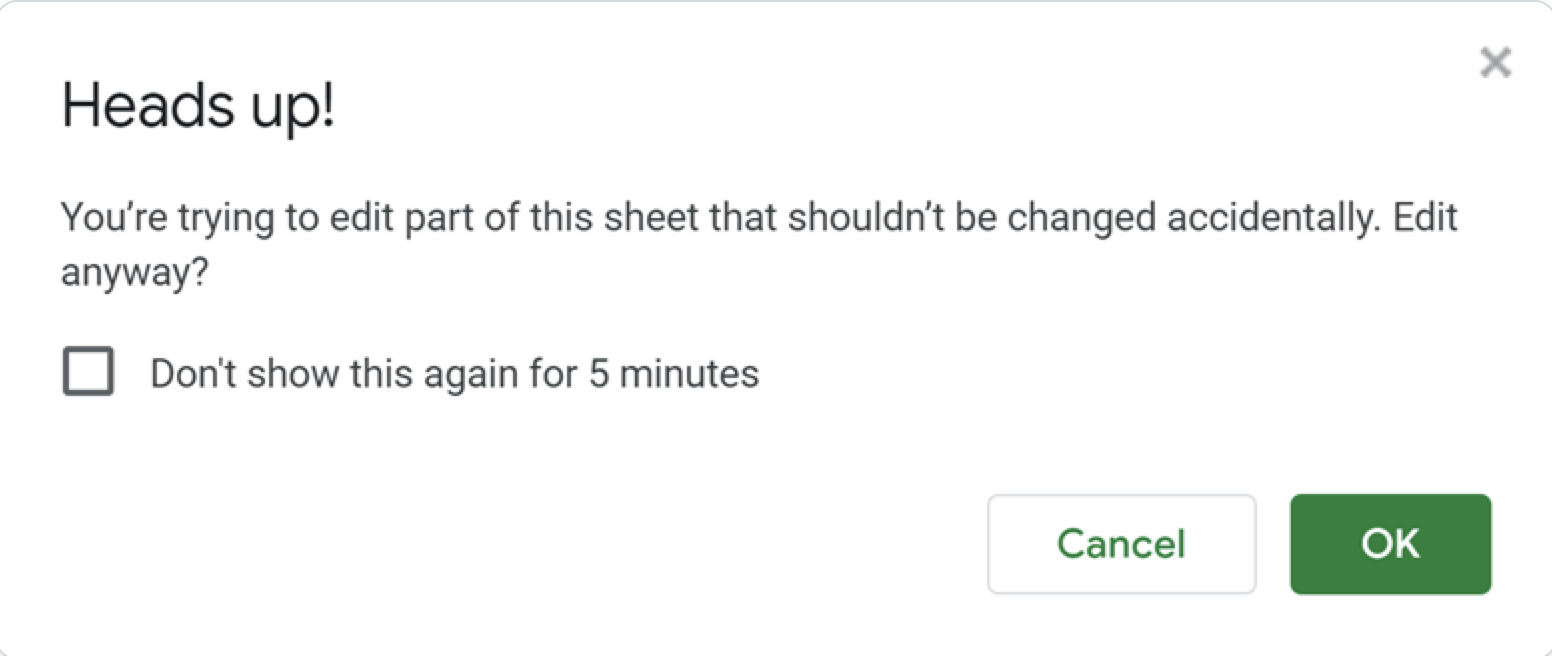
Another feature of Google Sheets is that you can add a soft warning rather than following a procedure on how to lock cells in Google sheets. The warning would indicate that this particular cell isn’t supposed to be edited.
This will allow the users to edit that particular cell still, but after showing a small warning.
This is what the warning would look like:
Check the “Show a warning when editing this range” from the Range editing permissions pop-up to enable this warning. Once done, click on “Done” to save new changes.
MUST READ: It's Official! Google Surveys Will Soon Be Discontinued
Unlocking Lock Cells In Google Sheets
To unlock the already locked cells, go to the “Data” option in the top menu of your Google Sheets. Then, select “Protect Sheets & Ranges” from the dropdown menu.
Clicking on it will open a side panel showing all the cells, rows or columns that have been locked.
To unlock a particular cell, select it and click on the small trash icon beside the “Enter a Description” field. Before you finalize things, Google Sheets will ask for your reassurance in the form of a pop-up. The pop-up will state, “Are you sure you want to remove this protected range?” To unlock the cell, click on “Remove.”
RELATED: The Easy Way To Create A Google Forms Survey
What To Know About Locked Cells In Google Sheets ?
You should know some points before you lock or unlock your cells in a Google spreadsheet.
- If you are not the owner of the sheet or do not have editing access to the locked cells, you cannot edit the content of those locked cells.
- Their content can still be copied or selected even if a cell is locked.
- There is no way to edit the content in those cells, but they can be formatted. As a result, locked cells can still change their font size, color, etc.
- Suppose a collaborator has editing access to the entire spreadsheet. In that case, they can still remove rows or columns, even if those rows/columns contain locked cells.
- Locking cells can only be applied to a particular sheet in the entire spreadsheet. You will be required to set up locked cells for each sheet individually.
Summing It Up
There’s nothing complicated about locking cells in Google Sheets. In addition to helping you secure essential data, this feature allows you to highlight important information and allow some key collaborators to edit the locked cells.