Respondents can skip unnecessary questions by using logic, branching, calculations, and variables in SurveyPoint. You can use these functions to ask respondents only the questions that pertain to them, add additional custom variable options, and make use of recall data.
For example, if they made a purchase with you, asking them about the quality of the product might seem fit. However, if they have never shopped with you before, asking such questions can be both – exhausting and mundane. A logic feature in SurveyPoint allows you to segregate the questions according to the previous responses for a personalized experience.
Let’s understand how to add logic to your conversational forms in SurveyPoint.
- Start off by logging in with your registered account. Once you have logged in, open your workspace.
- To create a new survey, click on “Create a new survey +” or use our pre-made templates by selecting “Use Templates.”
- Alternatively, you can edit an existing survey to add logic.

Let’s take a look at a mental awareness survey and add logic to that.

The above image is a consent form. Let’s suppose we want our respondents to check this consent box. In order to proceed with the next question, they must first complete this step.
- To make this happen, go to the logic option present on your sidebar. If you want to add a condition to a particular question, make sure you select that question before clicking on Logic.

Here is an example of the logic setting sidebar.

- There are two methods available on SurveyPoint for incorporating Logic.
- Simple Logic
- Advance Logic
- Simple Logic
Let’s analyze and look at them separately.
Simple Logic
- To add a Simple Logic, click on “Branching and Conditions.”

Once you do that, select the question to which you want to add the logic.

After you’ve made your selection, you’ll be taken to the page where you can add conditions on question paths.

- In this if/then notation, you can specify a condition such as if “they are 18 years and above ” and the answer is equal to “Yes”; then the respondent will be taken to the chosen question.
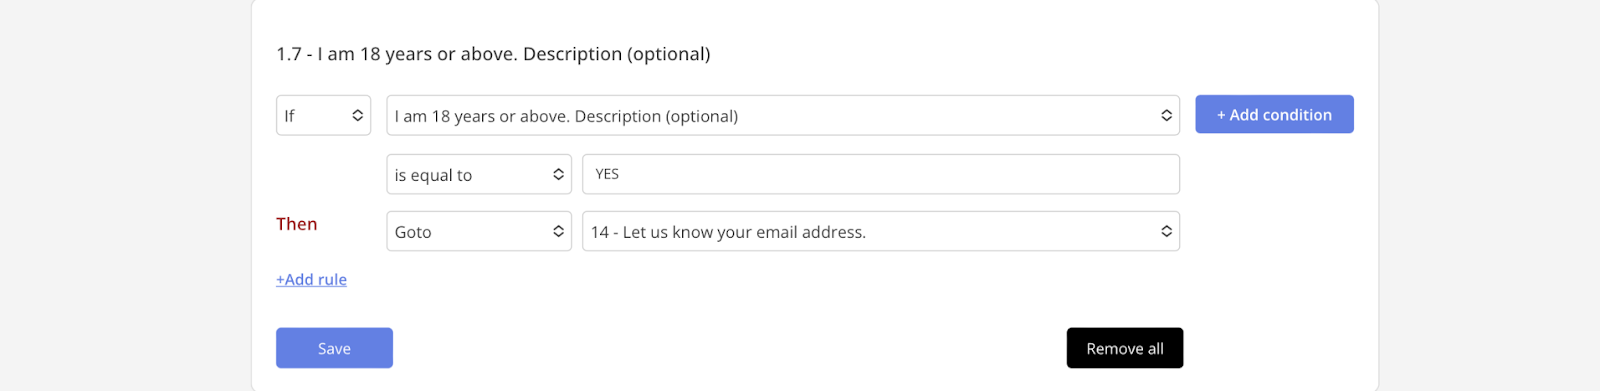
- By selecting “+Add Conditions,” you can add even additional prerequisites. To add a new rule to your logic, select the “+ Add Rule” button.
- Of course, there’s a lot more flexibility than just directing to a specific question. Multiple routes can be made available. In other words, logic allows us a lot of room for innovation.
- When you are happy with your branching conditions and routes, click Save.
- To get rid of all reasoning, simply select the Remove All option.
Advanced Logic
Variable logic and branching are related concepts in survey design, but they differ in their application.
Branching refers to the ability to show or hide questions based on the responses to previous questions. It creates a branching structure in the survey that leads to different paths for different respondents.
Variable logic, on the other hand, refers to the ability to perform operations on data collected from the survey to determine which questions to show or hide. This allows for more complex decision-making based on multiple conditions rather than just a simple branching structure.
In other words, branching is a way to direct the survey flow based on answers, while variable logic uses answers to perform calculations and make decisions. As a result of these decisions, the branching structure of the survey can be controlled.
Variable logic allows for branching and skip patterns in surveys, making them more tailored and efficient for respondents. It results in:
- Relevant questions based on previous answers
- Reduced completion time by skipping irrelevant questions
- Improved data quality by avoiding errors from irrelevant questions
- Increased engagement by making the survey feel personalized
Let’s take a look at Advanced logic settings.
- To get started, go to Advanced and click on Variables.
- Once you click on Variables, you will be redirected to a new page. Select the question to which you want to add the variable question type.

After you select a question to which logic needs to be added, you will see this window.

- In the select option, select your variable as “Text” or “Number.”
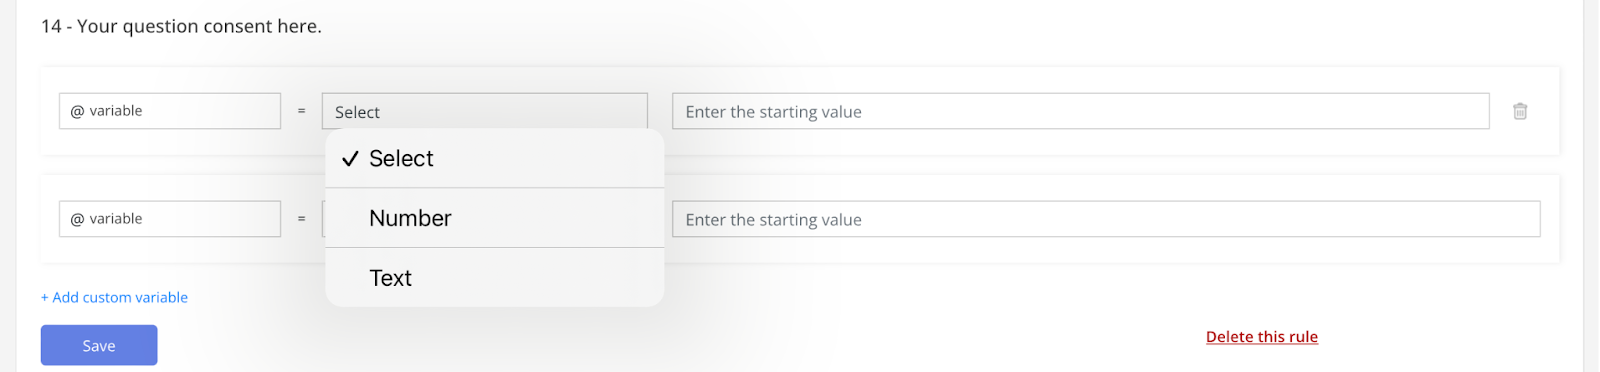
Let’s select the variable as Text.

- Enter the response to the question as done in the above image.
- You can also add custom variables by clicking “+ Add Custom Variables”. Moreover, to delete this logic, click on “Delete this rule.” To save the settings, click on Save.

Hope that solves all your doubts. However, if you still have questions, we are here to help.
Write to us at connect@surveypoint.ai, and our team will connect with you shortly.


