Once you are logged in to SurveyPoint and have created your workspace, it’s time to customize it.
The workspace on SurveyPoint allows you to create surveys, invite team members, add a project description and assign or track tasks given by other team members.
Let’s get started with updating the project description for your workspace.
Customizing The Look And Feel Of Your Workspace
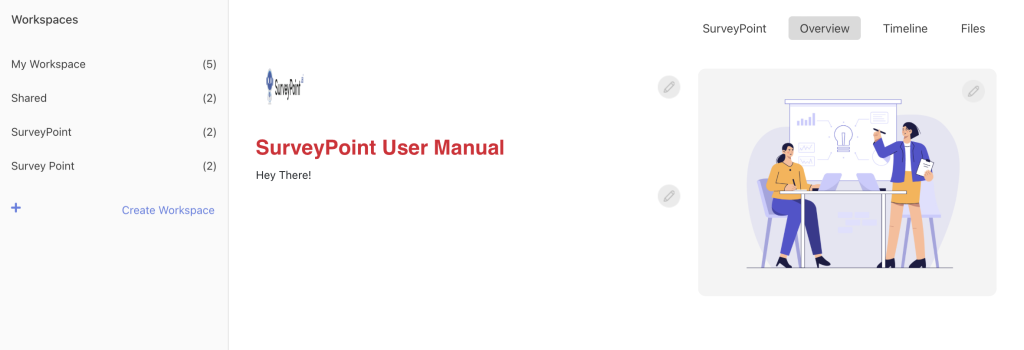
To add a project description to your workspace, click “Overview” on the top right of your screen.
Once you click on it, this is what your screen will look like. ?

To make things more interesting, you can add project details, titles, logos, and banners.
On my workspace, how can I add my brand’s logo?
If you want to add that extra touch to your workspace, you can add the brand logo by clicking on the pencil icon next to the ‘thumbnail picture button.’
Once you do that, you will see a small pop-up requesting you to upload the logo from your files.
To add the logo to your workspace, choose the file and then click “Submit.” After uploading the file, you will receive a prompt to save your logo. Please confirm by clicking on OK.
The logo will appear on the left side of your screen sidebar. You can always update your logo by re-selecting the pencil icon and adding a new image file.
Adding a title and description to your workspace.
If you want to provide your workplace with a more detailed description of your project, you may do so by clicking the pencil icon just below the logo change button.
Once you click on the icon, the above picture shows what your screen will look like. Simply enter the title of the project and give it a description. When done, click on submit to finalize things.
This is what your screen would look like once you have uploaded the logo and added the description.
Setting up your workspace with a banner.
You can make things more engaging and add your branding elements to your workspace by adding a banner as well. To add a banner, click the ‘pencil icon’ on the extreme right corner, present right inside the opaque box.
Once you click on it, a pop-up box will appear, asking you to upload a desired image from your files.
Invite Members To Your Workspace
SurveyPoint also allows you to invite members to your created workspace with just a single click.
To invite team members to your workspace, open the created workspace and click on “Invite members +”, present in the blue box.
Click on “Invite Members +” to add people to your workspace. Enter the e-mail address of the recipient and click “Submit.”.
You can either invite new members or add existing members to a new workspace. Members of your team who have already been added to your workspace appear under a ‘Suggested’ menu. Click on submit to add the member to your workspace.
Once you have added the member, you can change their access to editor or viewer.
- Editor – The editor access allows the added team member to get full control over your workspace. They can create, edit and submit surveys or make edits to the workspace’s description.
- Viewer – The viewer access allows the added team members to just view and track your progress without making any edits.
You can also remove team members under this suggestions tab.
With this capability, you can collaborate effectively with other team members on joint projects.
Adding A Task
To assign work, tap on the “Add Task” button on the top left corner of the screen.
In the pop-up window that appears when you click, you’ll be asked to create a task by filling out all the required information. Click “Submit” to successfully assign tasks to team members.
REMEMBER: Tasks can only be assigned to members of your workspace who have already been added. So, if you want to assign a task to someone, make sure they are added to your workspace first.
Timeline
SurveyPoint’s workspace also enables you to create an extended timeline and keep track of all organizational tasks.
This helps you stay in touch with your team, set realistic goals, and keep track of deadlines.
Accessing the timeline on your created workspace is pretty straightforward. To get started, open your workspace.
Then click “Timeline”, located between Overview and Files tabs.
The calendar allows you to add and manage all the tasks. You can switch the calendar’s perspective from monthly to weekly to daily.
Files
The Files section of the workplace allows you to add a file and access other files uploaded by you or other team members. In addition to the file’s name and latest modification date, you can also retrieve ownership and modification history details.
To access/upload the files, open My Workspace >> go to ‘Files’ on the top right corner of your screen.
Choose “Add Files” from the tab to upload your files.
An upload pop-up will appear on your screen, asking you to upload a file.
The files section on SurveyPoint also allows you to download the uploaded file, rename it and delete it from the workspace. To do this, click the ellipses (…) in the ‘Actions’ column and then pick the relevant action from the drop-down menu.
Hope this solves all your confusion. However, if you are still unclear about anything, feel free to reach out to us at connect@surveypoint.ai, and your team will contact you shortly.


